
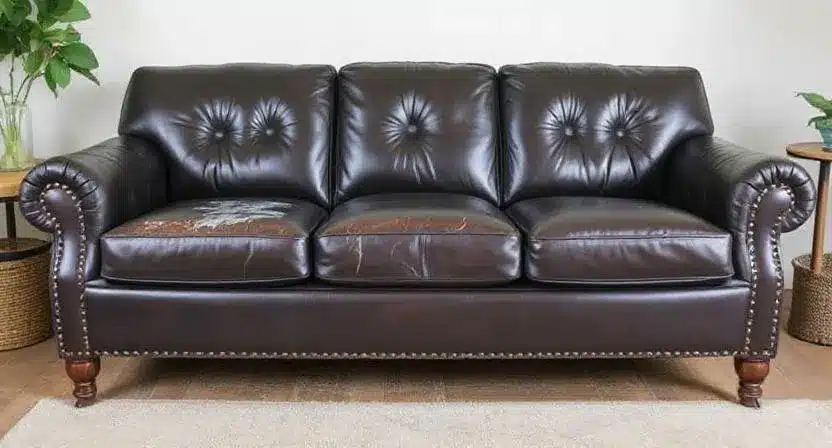
Have you ever looked at your favorite leather couch and wondered if there’s a way to bring it back to its former glory without spending a fortune on professional services?
If your answer is yes, you’re in the right place. In this guide, we’ll walk you through exactly how to restore leather furniture—even if you’re completely new to DIY. By following these steps and tips, you can give your worn-out sofa or armchair a second life while saving money. Not to mention, restoring your own pieces can be surprisingly fun and rewarding!
In this article, you’ll learn not just how to restore leather furniture but also how to maintain and care for it so it stays in top condition. You’ll get real-world examples, evidence-based advice, and insights from reputable sources—everything you need for a polished, professional-looking result.
Why Restore Leather Furniture?
1. Cost Savings and Personal Satisfaction
Leather furniture can be expensive, especially if you decide to replace it entirely. By restoring your own pieces, you’ll save money and get the satisfaction of knowing you tackled the project with your own two hands.
2. Environmental Benefits
Restoring instead of discarding is an eco-friendly choice. You’re keeping old furniture out of landfills and reducing the demand for new production. According to the U.S. Environmental Protection Agency (EPA), reducing waste is a critical step toward a healthier planet.
3. Personal Aesthetics and Sentimental Value
Some pieces of furniture hold a special place in our hearts, perhaps inherited from loved ones or collected during meaningful travels. Reviving a piece with personal history is both cost-effective and emotionally rewarding.
Essential Tools and Materials
Before you begin restoring leather furniture, gather the following tools and materials. Having them close at hand will make the process smoother and beginner-friendly.
- Soft Cloths or Microfiber Towels – For gentle cleaning and applying solutions.
- Leather Cleaner – Specifically designed for leather surfaces; avoid harsh chemicals.
- Leather Conditioner – Maintains moisture and suppleness.
- Leather Repair Kit – Includes filler, adhesive, and colorants for fixing cracks and scratches.
- Protective Gloves – Keep your hands safe from cleaning agents and dyes.
- Mild Soap and Warm Water – Useful for an initial wipe-down if the leather is very dirty.
- Small Brushes or Sponges – To apply fillers or dyes accurately.
Pro Tip: Look for products certified by organizations like the Leather Working Group. They often hold brands to higher environmental and quality standards.
Step-by-Step Guide to Restoring Leather Furniture
1. Initial Cleaning and Inspection
- Vacuum or Dust the Surface
Start by removing debris, dust, or crumbs. Pay special attention to crevices and seams. - Wipe with a Mild Soap Solution
Mix mild soap with warm water. Dip a soft cloth or sponge into the solution, wring it out, and gently wipe the leather. This helps remove surface-level grime.- Example: If you notice sticky spots or grease stains, focus on these areas first. Take your time—rushed cleaning can damage the leather.
- Dry the Furniture
Use a clean, dry cloth to wipe off excess moisture. Allow the surface to air-dry for at least 30 minutes before the next step. - Inspect for Damages
Look for cracks, scratches, faded spots, or discoloration. This will help you decide what kind of repairs or touch-ups are needed.
“A good cleaning is half the job done; it reveals what you really need to fix,” says Sarah Mitchell, a restoration expert who has rehabilitated over 200 vintage leather pieces.
2. Repairing Minor Scratches and Cracks
- Choose the Right Repair Product
A leather repair kit usually includes filler or adhesive and a color compound. Match the color as closely as possible to your furniture’s original shade. - Apply Filler or Adhesive
- If there’s a small tear or scratch: Use a leather adhesive to seal and strengthen the area.
- If you have cracks or peeling: Apply a leather filler with a small spatula or brush. Smooth it out to blend with the rest of the surface.
- Let It Dry Completely
Follow the manufacturer’s instructions. Typically, you’ll need to let the filler or adhesive cure for at least a few hours or overnight. - Lightly Sand (If Needed)
After the filler dries, gently sand the repaired area with a fine-grit sandpaper to ensure a smooth finish. Wipe away any dust with a dry cloth.
Real-Life Example: I once restored a vintage leather armchair from a local thrift store. It had multiple tiny cracks. By applying filler and sanding lightly, I managed to blend in the repaired sections so well that you can’t even tell the chair was ever damaged!
3. Conditioning and Re-Dyeing
- Test the Dye
Always test the dye or colorant on a small, hidden area first. This ensures it matches and doesn’t adversely react with the leather. - Apply the Dye
Use a small sponge or brush, working in thin, even layers. Build up color gradually.- Start from one corner and work your way across the surface.
- Allow each layer to fully dry before adding another.
- Condition the Leather
Once the dye is dry, apply a good-quality leather conditioner. Massage it in using a circular motion. This step is crucial for restoring moisture and preventing future cracks.- Let it sit for about 15–30 minutes, then wipe off any excess.
- Polish and Protect
For a final touch, buff the leather lightly to restore shine. Some conditioners also contain protective agents, but you can add a specialized protectant for extra durability if you prefer.
Expert Insight: According to the Leather Repair and Restoration Institute, conditioning is one of the most overlooked steps. Proper conditioning not only revives the look but also extends your furniture’s lifespan significantly.
Tips for Maintaining Leather Furniture
Now that you’ve successfully restored your leather furniture, it’s time to keep it looking fresh. Here are some tips to help you maintain that like-new appearance:
- Regular Dusting
A quick wipe with a soft cloth or microfiber towel once a week can prevent dust buildup and surface dirt. - Use a Leather Conditioner Every Few Months
Consistent conditioning ensures your furniture stays supple and resistant to cracks. - Keep It Away from Direct Sunlight and Heat
Prolonged exposure to sun or heat vents can cause fading and dryness. - Clean Spills Immediately
Leather can be surprisingly resilient, but allowing liquids to sit will increase the risk of staining or discoloration. - Avoid Harsh Chemicals
Stick to cleaners formulated for leather. Generic household cleaners can strip oils and damage the surface.
Key Takeaways
- Restoring leather furniture isn’t just about aesthetics—it’s also cost-effective and eco-friendly.
- Proper cleaning and inspection are essential first steps.
- Repair minor scratches and cracks using fillers or adhesives specifically designed for leather.
- Condition and dye to restore color and maintain suppleness.
- Routine maintenance ensures your leather pieces stay beautiful and last longer.
Frequently Asked Questions (FAQ)
Q1: How often should I condition my leather furniture?
A: Generally, every 3 to 6 months. If you live in a dry climate or use your furniture heavily, you might condition more often.
Q2: Can I use homemade cleaning solutions?
A: Mild soap with warm water is a safe option for light cleaning. However, for deep cleaning or restoration, it’s best to use products specifically designed for leather.
Q3: What if the color doesn’t match after I dye the leather?
A: Try mixing small amounts of different dyes to achieve a closer color. Test on a hidden area. If the color is far off, consult a professional or contact the dye manufacturer for advice.
Q4: Is it better to hire a professional?
A: For severe damage (large tears or structural issues), professional help may be worth it. However, for minor scratches, light cracks, and routine restoration, a DIY approach is usually sufficient.
Q5: Can I restore bonded leather using these methods?
A: Bonded leather is not 100% genuine leather and often doesn’t respond as well to restoration processes. You can try minor repairs, but results may not be as long-lasting.
Conclusion
Restoring leather furniture can be a rewarding do-it-yourself project that saves you money and showcases your newfound skills. By following a detailed approach—cleaning, repairing, conditioning, and maintaining—you can bring life back to worn or faded pieces. Not only will you boost your living space’s appearance, but you’ll also keep valuable items out of landfills, contributing to a more sustainable lifestyle.
Whether you’re sprucing up a family heirloom or breathing new life into a thrift-store find, these steps will guide you through how to restore leather furniture with ease. Armed with the right products, a little patience, and some genuine enthusiasm, you’ll soon find yourself admiring your refreshed, stylish, and comfortable leather treasures.
“Taking on a restoration project doesn’t just give you a beautiful piece of furniture—it also instills a sense of pride every time you look at the finished work,” says renowned furniture craftsman James Rodriguez.
So roll up your sleeves and dive in—your beautifully restored leather furniture awaits!